IndyMill
Jump to navigation
Jump to search
About
Somewhere in 2022 I decided I wanted a CNC machine. I decided to build an IndyMill.
Project website: https://indystry.cc/indymill/
Ordering
TBD
Building
TBD
Setting up GRBL
Installing GRBL
| 🛑 | Dies might be a bad idea, since GRBL has been abandoned since 2019… |
- Install Arduino IDE 1.x (not 2.x!)
- Setup board type
- Setup serial/USB-connection (you might want to add your user to group dialout to allow accessing
/dev/ttyUSB0…) - Download as .zip: https://github.com/gnea/grbl
- Extract zip
- Open Arduino IDE
Sketch →
Library Import as .ZIP → select grbl-master/grbl
File → Examples → grbl → grblUpload
Testing Connection
- Download CNCjs-AppImage: https://cnc.js.org/
- Launch it, set Connection parameters (device / speed)
- Enter something like this:
- Get current settings with
$$
CNCjs 1.10.3 [Grbl]
Connected to /dev/ttyUSB0 with a baud rate of 115200
Grbl 1.1h ['$' for help]
client> $$
$0=10 (Step pulse time, microseconds)
$1=25 (Step idle delay, milliseconds)
$2=0 (Step pulse invert, mask)
$3=0 (Step direction invert, mask)
$4=0 (Invert step enable pin, boolean)
$5=0 (Invert limit pins, boolean)
$6=0 (Invert probe pin, boolean)
$10=1 (Status report options, mask)
$11=0.010 (Junction deviation, millimeters)
$12=0.002 (Arc tolerance, millimeters)
$13=0 (Report in inches, boolean)
$20=0 (Soft limits enable, boolean)
$21=0 (Hard limits enable, boolean)
$22=0 (Homing cycle enable, boolean)
$23=0 (Homing direction invert, mask)
$24=25.000 (Homing locate feed rate, mm/min)
$25=500.000 (Homing search seek rate, mm/min)
$26=250 (Homing switch debounce delay, milliseconds)
$27=1.000 (Homing switch pull-off distance, millimeters)
$30=1000 (Maximum spindle speed, RPM)
$31=0 (Minimum spindle speed, RPM)
$32=0 (Laser-mode enable, boolean)
$100=250.000 (X-axis travel resolution, step/mm)
$101=250.000 (Y-axis travel resolution, step/mm)
$102=250.000 (Z-axis travel resolution, step/mm)
$110=500.000 (X-axis maximum rate, mm/min)
$111=500.000 (Y-axis maximum rate, mm/min)
$112=500.000 (Z-axis maximum rate, mm/min)
$120=10.000 (X-axis acceleration, mm/sec^2)
$121=10.000 (Y-axis acceleration, mm/sec^2)
$122=10.000 (Z-axis acceleration, mm/sec^2)
$130=200.000 (X-axis maximum travel, millimeters)
$131=200.000 (Y-axis maximum travel, millimeters)
$132=200.000 (Z-axis maximum travel, millimeters)
ok
GRBL-Settings
Setting step width
- Change settings as described in Nikodem's manual for stepwidth:
$1=255
ok
$100=640
ok
$101=640
ok
$102=400
ok
$110=1000
ok
$111=1000
ok
$112=1000
ok
$120=80
ok
$121=80
ok
$122=80
ok
I changed above to meet my (micro)-stepping-setup (DIP #2 of my TB6600, micro-step 8, Pulse/Rev 1600) and ball-screws.
$100=320
$101=320
$102=800
Hint: Make sure you reset the machine after changing values, my GRBL acted strangely when not.
Setting directions
Enabling Limit-Switches
- See also:
- Do:
- MAYBE NOT: Enable hard limits:
$21=1 - Enable homing cycle:
$22=1 - Set top left home location:
$23=1(see above links for more values)
- MAYBE NOT: Enable hard limits:
Testing
Try this:
$H
Z-Axis-Probe
- See also:
- Do:
- TBD
Work with CAD- and CAM-Software
Converting STL to solids in FreeCAD
See also: https://forum.freecad.org/viewtopic.php?t=14136
- Open the STL file
- Select object
Part → Create shape from mesh
- Select new object
Part → Converte to solid
Create GCODE with JSCut.org
| 💡 | If you're creating your own SVG, make sure the pockets are "objects", meaning "areas", not paths. |
- Create SVG
- Launch https://jscut.org/
- Open SVG
- Set units correctly (in my case mm)
- Set speeds and diameters, material strength and so on...
- Select object
- Generate operation
- Preview
- Download
- Hope for the best :)
Create GCODE with FreeCAD
See also
Do:
- Launch FreeCAD
- Make sure you have already created proper solids (see above)!
- Make sure units are ok:
Preferences → General → Unit System → Metric small parts & CNC
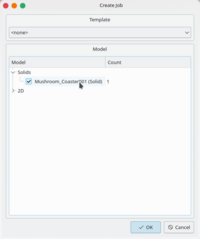
- Create Job:
- Choose solid:
- Set


Output to grbl
- Create tools as needed:
Path → Toolbit Library Editor
- Remove default tool
- Choose Tool, set # to 1
- Set H/V speed
- TBD TBD TBD
Lessons Learned
- Origin is in front-left corner, increasing up (Z), right (X) and back (Y)
- Double-Check all settings before first use (most importantly step width, end switches)
- Don't think it's as easy as 3D-Printing!
- You have to make decisions while creating the GCODE:
- Which pockets should be done first?
- Which pockets should be done last?
- Will any operation make your part move or break?
- Links
- TBD
- Footnotes:
- ↑ https://forum.makerforums.info/t/how-do-i-invert-the-y-and-z-axis-of-my-grbl-cnc-arduino-uno/80114
- ↑ https://www.diymachining.com/downloads/GRBL_Settings_Pocket_Guide_Rev_B.pdf
- ↑ https://linuxcnc.org/docs/html/user/user-concepts.html#_machine_configurations
- ↑ https://www.cnc4fun.com/wp-content/uploads/2019/12/Grbl-Commands-v1.1-2.pdf