IndyMill
About
Somewhere in 2022 I decided I wanted a CNC machine. After lengthy consideration the many options I decided to build an IndyMill.
Project website: https://indystry.cc/indymill/
The building volume with my current limit switch configuration is about (X * Y * Z): 340 * 330 * 100mm
Ordering
TBD
Building
TBD
Setting up GRBL
| 🛑 | Dies might be a bad idea, since GRBL has been abandoned since 2019…
|
Installing GRBL
- Install Arduino IDE 1.x (not 2.x!)
- Setup board type
- Setup serial/USB-connection (you might want to add your user to group dialout to allow accessing
/dev/ttyUSB0…) - Download as .zip: https://github.com/gnea/grbl
- Extract zip
- Open Arduino IDE
Sketch →
Library Import as .ZIP → select grbl-master/grbl
File → Examples → grbl → grblUpload → →
Testing Connection
- Download CNCjs-AppImage: https://cnc.js.org/
- Launch it, set Connection parameters (device / speed)
- Enter something like this:
- Get current settings with
$$
CNCjs 1.10.3 [Grbl]
Connected to /dev/ttyUSB0 with a baud rate of 115200
Grbl 1.1h ['$' for help]
client> $$
$0=10 (Step pulse time, microseconds)
$1=25 (Step idle delay, milliseconds)
$2=0 (Step pulse invert, mask)
$3=0 (Step direction invert, mask)
$4=0 (Invert step enable pin, boolean)
$5=0 (Invert limit pins, boolean)
[…]
$132=200.000 (Z-axis maximum travel, millimeters)
ok
GRBL-Settings
Setting step width
- Change settings as described in Nikodem's manual for stepwidth:
$1=255
ok
$100=640
ok
$101=640
ok
$102=400
ok
$110=1000
ok
$111=1000
ok
$112=1000
ok
$120=80
ok
$121=80
ok
$122=80
ok
I changed above to meet my (micro)-stepping-setup (DIP #2 of my TB6600, micro-step 8, Pulse/Rev 1600) and ball-screws.
$100=320
$101=320
$102=400
Hint: Make sure you reset the machine after changing values, my GRBL acted strangely when not.
Setting directions
My settings (preliminary)
CNCjs 1.10.3 [Grbl]
Connected to /dev/ttyACM0 with a baud rate of 115200
Grbl 1.1h ['$' for help]
client> $$
[MSG:'$H'|'$X' to unlock]
$0=10 (Step pulse time, microseconds)
$1=25 (Step idle delay, milliseconds)
$2=0 (Step pulse invert, mask)
$3=5 (Step direction invert, mask)
$4=0 (Invert step enable pin, boolean)
$5=1 (Invert limit pins, boolean)
$6=0 (Invert probe pin, boolean)
$10=1 (Status report options, mask)
$11=0.010 (Junction deviation, millimeters)
$12=0.002 (Arc tolerance, millimeters)
$13=0 (Report in inches, boolean)
$20=0 (Soft limits enable, boolean)
$21=0 (Hard limits enable, boolean)
$22=1 (Homing cycle enable, boolean)
$23=0 (Homing direction invert, mask)
$24=25.000 (Homing locate feed rate, mm/min)
$25=500.000 (Homing search seek rate, mm/min)
$26=250 (Homing switch debounce delay, milliseconds)
$27=2000.000 (Homing switch pull-off distance, millimeters)
$30=1000 (Maximum spindle speed, RPM)
$31=0 (Minimum spindle speed, RPM)
$32=0 (Laser-mode enable, boolean)
$100=320.000 (X-axis travel resolution, step/mm)
$101=320.000 (Y-axis travel resolution, step/mm)
$102=400.000 (Z-axis travel resolution, step/mm)
$110=500.000 (X-axis maximum rate, mm/min)
$111=500.000 (Y-axis maximum rate, mm/min)
$112=500.000 (Z-axis maximum rate, mm/min)
$120=23.000 (X-axis acceleration, mm/sec^2)
$121=23.000 (Y-axis acceleration, mm/sec^2)
$122=10.000 (Z-axis acceleration, mm/sec^2)
$130=200.000 (X-axis maximum travel, millimeters)
$131=200.000 (Y-axis maximum travel, millimeters)
$132=200.000 (Z-axis maximum travel, millimeters)
ok
>
Enabling Limit-Switches
- See also:
- Do:
- MAYBE NOT (but definitely while testing limit switches!): Enable hard limits:
$21=1 - Enable homing cycle:
$22=1 - Set top left home location:
$23=1(see above links for more values) - Set
$5according to NO/NC switches used
- MAYBE NOT (but definitely while testing limit switches!): Enable hard limits:
Testing
Try this:
$H
Z-Axis-Probe
- See also:
- Do:
- TBD
Work with CAD- and CAM-Software
Creating GCODE
JSCut.org
| 💡 | Tipps: |
| ℹ️ | JSCut is awesome, but has downsides:
More about JSCut: https://www.youtube.com/watch?v=dVgf0Hf91vA |
- Create SVG with Inkscape
- Launch https://jscut.org/
- Open SVG
- Set units correctly (in my case mm)
- Set speeds and diameters, material strength and so on...
- Select object
- Generate operation
- Preview
- Repeat operation-generation for all your objects
- Download
- Hope for the best :)
PyCAM
Still needs python 2.7 and seems to abandoned since 2019.
Blender CAM
NOT TESTED YET!
gcad3d
NOT TESTED YET!
Other Software (yet to test)
- https://pycam.sourceforge.net/other-programs/
- https://github.com/linuxcnc/simple-gcode-generators
- GCode-Extension of Inkscape
krabzcam
NOT TESTED YET! Looks much like jscut, but a bit more sophisticated.
- Launch: https://mkrabset.github.io/krabzcam/index.html
- Manual: https://mkrabset.github.io/krabzcam/manual/manual.html
FreeCAD
See also
Do:
- Make sure you played with Inkscape-SVGs and jsCut enough to understand the basics, otherwise handling (the much more complex FreeCAD) will be very frustrating…
- Launch FreeCAD
- Make sure you have already created proper solids (see above)!
- Make sure units are ok:
Preferences → General → Unit System → Metric small parts & CNC
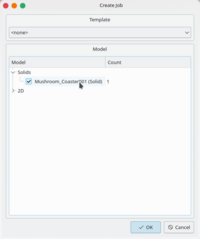
- Create Job:
- Choose solid:
- Set


Output to grbl
- Create tools as needed:
Path → Toolbit Library Editor
- Remove default tool
- Choose Tool, set # to 1
- Set H/V speed
- TBD TBD TBD
Converting STL to solids in FreeCAD
See also: https://forum.freecad.org/viewtopic.php?t=14136
- Open the STL file
- Select object
Part → Create shape from mesh
- Select new object
Part → Converte to solid
Lessons Learned
General
- Origin is in front-left corner, increasing up (Z), right (X) and back (Y)
- Origin of SVG-designs is usually top-left corner, increasing right (X), decreasing towards you (Y)
- Double-Check all settings before first use (most importantly step width, end switches)
- Don't think it's as easy as 3D-Printing, where the slicer will do all the work for you!
- You have to make decisions while creating the GCODE or even the design:
- Which pockets should be done first?
- Which pockets should be done last?
- Will any operation make your part move or break?
- Which speed is best?
- What kind of operation do you need? Pocket? Engrave?
- Which milling bits will you use?
- If you don't use hard limits ($21=1), then GRBL will jog happily ahead, even if the endswitch has opened.
- At least homing ($H) works without hard limits, since it retracts a bit to close the switches again.
- Hard limits comes in very handy if your testing your limit switches!
Cutting Speeds
| 🚧 | This is very much likely to change - I'm still learning every day! |
| material | challenges | tool | diameter (mm) | speed (mm/min) | attack (mm) | rpm | spindle | cooling | notes | Links |
|---|---|---|---|---|---|---|---|---|---|---|
| Plexiglas (PMMA) melts at 160°C (even earlier than your printer's PLA or PETG). | These are the key challenges:
Methods to keep cool: reduce speed (less than 500mm/min) and attack (0.5-1.0mm) |
single-flute | 2.0 | 300 | 1.0 | 10,000 | 500W china | none | yet to test! | Great tipps: https://www.cnc-step.de/plexiglas-fraesen/ |
| material | challenge | tool | diameter | speed | attack | rpm | spindle | cooling | comments | |
| material | challenge | tool | diameter | speed | attack | rpm | spindle | cooling | comments |
Troubleshooting
10mm are not 10mm
Check $100, $101, $102, your driver's micro-step-settings and your ballscrews.
CNCjs-AppImage won't run on Lenovo T60
The T60 is kinda 32bit, that might be the catch.
Try installing with npm: https://www.npmjs.com/package/cncjs
Run it:
heiko@T60-1951-debian:~$ cncjs
2024-02-18T15:29:24.819Z - info init Loading configuration from "/home/heiko/.cncrc"
(node:20609) Warning: Accessing non-existent property 'padLevels' of module exports inside circular dependency
(Use node --trace-warnings ... to show where the warning was created)
2024-02-18T15:29:25.386Z - info init Starting the server at http://127.0.1.1:8000
Use it:
http://127.0.1.1:8000
Cut freezes
The Problem
The cutting, or, to be more precise, the motion stops. The grbl console in CNCjs shows some garbled messages, mostly one "o" or "k". Status is then idle, and can be continued by pausing and restarting the cut. When using UGS, it shows a message about a stream (serial connection) can't be established. The problem is not 100% reproducible - sometimes the machine runs flawless for 15 minutes (my test cut), and sometimes it stalls every 10 seconds.
The Analysis
- Similar problems from the net:
- https://github.com/grbl/grbl/issues/483
- this about serial drivers and UNOs/replicas
- Try another G-Code-Sender (like UGS instead if CNCjs) (UGS is more chatty when encountering problems than CNCjs)
- Disable spindle
- Disconnect limit-switches (and turn
$5off accordingly (set to 0 if using normally-closed (as you should be)) - Check stepper frequencies (vs. micro-stepping-settings) - can your Arduino UNO produce the required frequencies?
- Disable steppers (shutting off power supply)
- Disable WiFi
- Try another, short, shielded USB-cable
- Try an USB-isolator, I used some 18€ item from amazon, and it seems to worsen the problem, maybe this is just snakeoil
- Unplugging the arduino power adaptor seems to help a little
- Use another computer
- Lenovo M72e: no luck
- Lenovo T60: no luck
- Apple MacBook Pro 13" (plug the power adaptor into Apple MacBook Pro 13", not the docking station → seems to work most of time)
I think it's safe to say, that the Arduino UNO (please note, that mine is a cheap-8€-knock-off from china) has a badly designed serial interface with shielding/grounding issues.
The Workaround
None of the above brought up a viable solution.
This is what works for me as a workaround:
- Keep humidity low and temperature on a comfy level
- Unplug the arduino power supply, let the PC power the UNO
- Use MacBook Pro 13" with NO power supply attached (or maybe plugged in the MBP, not the docking station)
The Solution
Dump the crappy not-genuine UNO board and get a genuine one. Works like a charm.
- Links
- TBD
- Footnotes:
- ↑ https://forum.makerforums.info/t/how-do-i-invert-the-y-and-z-axis-of-my-grbl-cnc-arduino-uno/80114
- ↑ https://www.diymachining.com/downloads/GRBL_Settings_Pocket_Guide_Rev_B.pdf
- ↑ https://linuxcnc.org/docs/html/user/user-concepts.html#_machine_configurations
- ↑ https://www.cnc4fun.com/wp-content/uploads/2019/12/Grbl-Commands-v1.1-2.pdf